Showing posts with label birthday. Show all posts

Wednesday, September 24, 2014

Rainbow cake

Another check on my to-do list ~ Rainbow cake! Looking at the cake itself makes one so happy lol.

I'm using my usual vanilla sponge cake recipe to make a 7-layers 4.5" round cake. I'm also using my now-favourite cream cheese frosting. Both the sponge cake and frosting turned out very good!


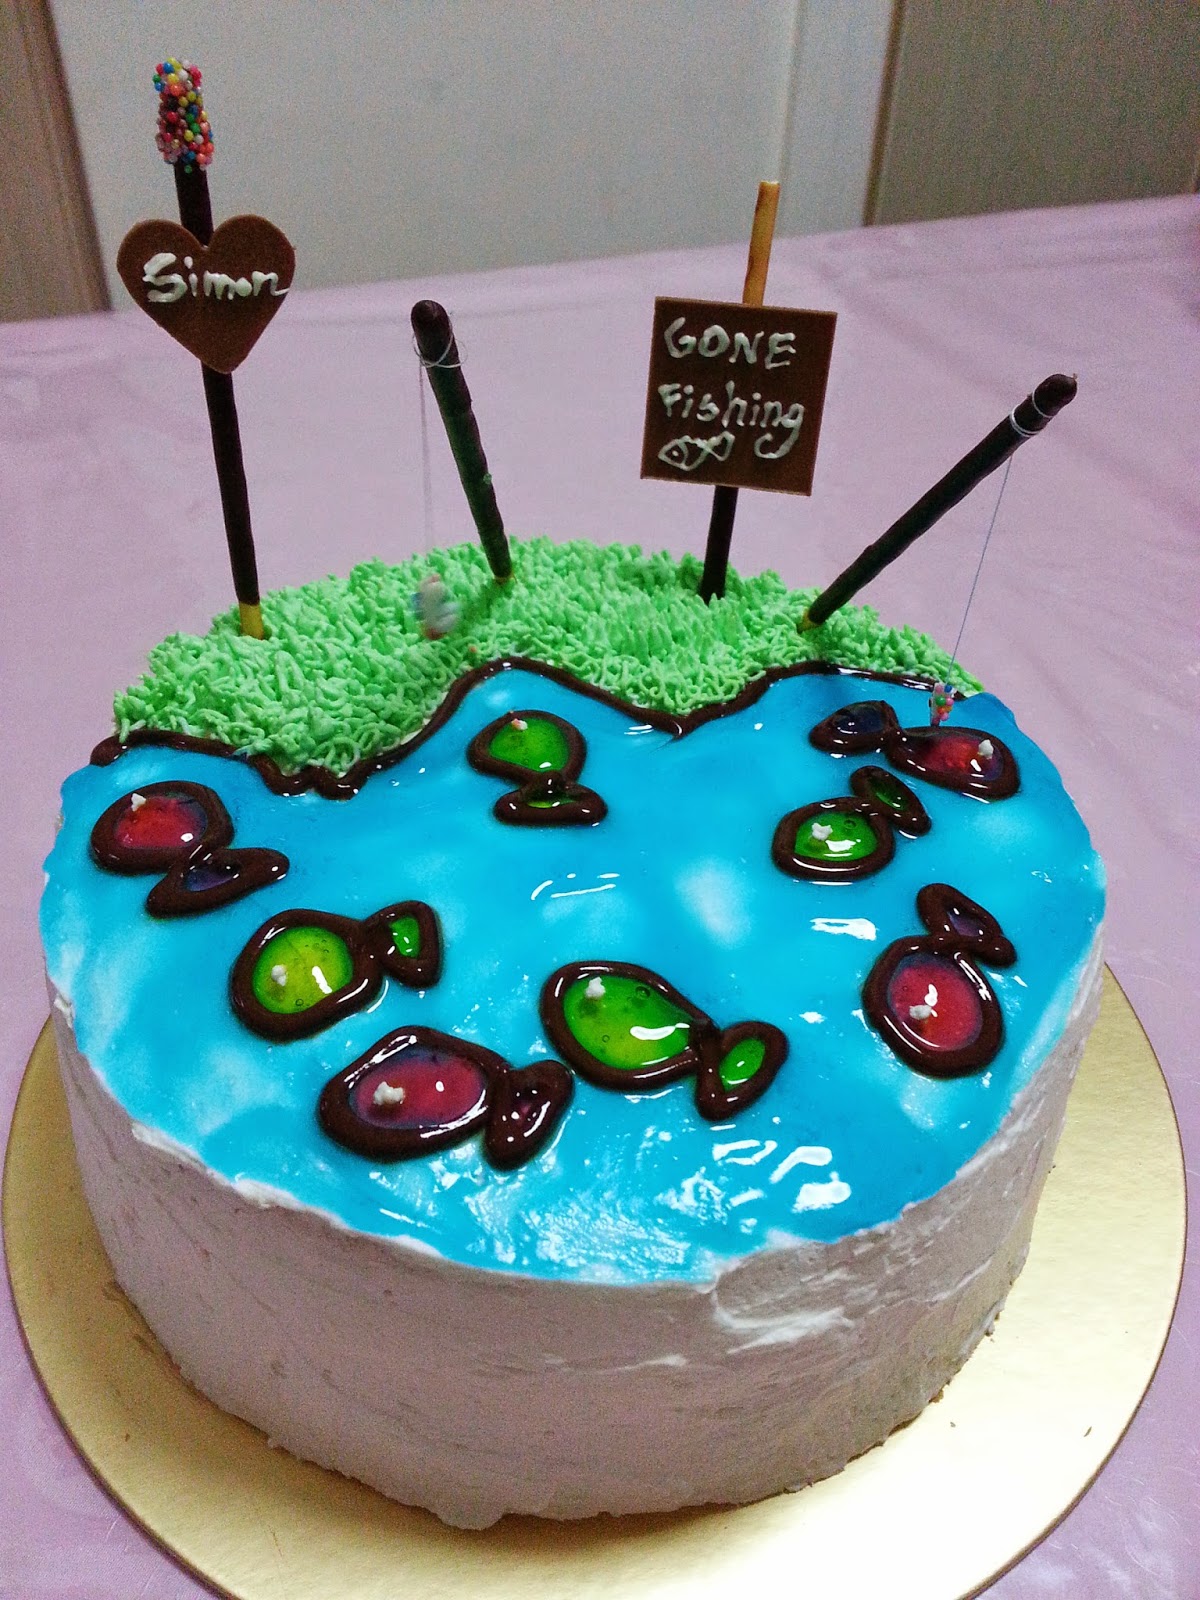
My frosting skills is still quite bad, so I've to create some "designs" to hide the flaws.


Vanilla Sponge Cake

Ingredients/ Method:
(A)
150g cake flour/superfine flour
1/2 tsp (2g) baking powder
1/4 tsp (1g) salt
10g milk powder

(B)
60g cooking oil
50g water
4 (75g) yolks
80g castor sugar
1 tsp vanilla extract

(C)
4 (150g) whites
90g castor sugar (original 100g)
1/4 tsp (1g) cream of tartar

(D)
Colour gel
  1. Sift ingredients (A) and put it aside
  2. Whisk yolks and sugar till it turns lemon color
  3. Add oil, water and vanilla and mix till well blended
  4. Add ingredients (A) and mix it slowly till it forms a smooth batter
  5. Whisk (C) till stiff
  6. Fold in 1/3 of egg white mixture into egg yolk mixture and gently stir, then fold in the remaining egg white mixture and mix well gently
  7. Divide batter equally into 7 portions and into individual small bowls. (I got about 90g for each portion, but I would reduce it to 60-70g the next time.)
  8. Add colour gels into batter and mix well gently, and not to deflate too much air bubbles.
  9. Pour batter into lined cake tin. (I used disposable aluminum foil-type 4.5" round tin as I don't have so many cake pans.)
  10. Bake in a preheated oven 180C for 10-12 mins or when skewer comes out clean when inserted to the centre of cake.
  11. Removed from oven and let cake cool in pan for 5 mins on wire rack.
  12. Remove cake from pan and let it cool completely on wire rack.
Notes:
  1. If using the same size 4.5" round tin and 7 layers, just need to prepare 2/3rd of this recipe. Alternatively, you can bake the balance 1/3rd batter as vanilla cupcakes.
  2. As my oven can only bake 4 small tins at a time, I mix the egg yolk mixture and egg white in 2 batches.
  3. I used toothpick when adding and mixing colours to the batter, and using a small spatula to give a last few folds to ensure colours are evenly mixed.
  4. Insert straws to hold the cake, especially when this cake base is small and pretty tall. 
Cream cheese frosting
250g cream cheese
170g unsalted butter, softened
70g icing sugar, sieved
1 tsp vanilla extract
  1. Using an electric mixer on medium-high speed, beat butter and cream cheese until fluffy, about 2 to 3 minutes.
  2. Reduce speed to low. Add sugar in three batches, then add vanilla and mix till smooth and combined, scraping down sides of bowl as needed. (If not using immediately, frosting can be refrigerated up to 3 days in airtight container. Before using, bring to room temperature and beat on low speed until smooth again.)

Tuesday, September 23, 2014

Superman 2-tier cake

Another birthday cake for my nephew 6th birthday!
 

Instead of the usual chocolate cake base, I found another similarly good one which was used by Jane in her salted caramel cake.


Chocolate cake 
(recipe adapted from Passionate About Baking, originally from Martha Stewart)

Ingredients/ Method
375g plain flour
380g castor sugar
129g unsweetened dutch-processed cocoa powder
1 tbsp baking soda
1 1/2 tsp baking powder
1 1/2 tsp coarse salt
4 large eggs
368g buttermilk (or 366g whole milk with 1 1/2tsp lemon juice, mix well and let it sit for 5 mins)
90g warm water
137g vegetable oil
2 tsp vanilla extract
  1. In a bowl, sift flour, sugar, cocoa powder, baking soda, baking powder and salt. Beat on low speed until just combined.
  2. Add eggs, buttermilk, warm water, oil and vanilla extract and beat on medium speed, until smooth. Takes about 3 mins.
  3. Pour batter equally into two 9" lined round cake pans. 
  4. Bake on pre-heated oven 180 deg C for about 35-40 mins, or until skewer inserted into centre of cake comes out clean. 
  5. Let cake cool in pans on a wire rack for 15 mins. 
  6. Remove cake from pans onto wire rack, and let cool completely. 

Monday, September 15, 2014

Gone fishing! cake


This Gone fishing! cake was prepared especially for my uncle Simon, after knowing that he likes playing with the fishing game on mobile! Although I was very happy with the design of the birthday cake, the texture of the cake was slightly on the dry side. I'm using my earlier successful vanilla sponge cake base. Mistake 1: the cake was not thoroughly baked at 33 mins, and I gave it a couple more minutes (a minute too many) and turn it to fan-oven; Mistake 2 - wanted to slice the 8' round cake into 3 even slices, but end up slicing up to 2 uneven thickness.


Thursday, July 31, 2014

Salted caramel & oreo cheesecake

This was a birthday cake baked at the last minute as I was not feeling well over the weekend. I've planned to bake this cheesecake long ago and I was even hesitating to present it as a belated birthday cake. Unfortunately I was not able to attend the birthday dinner on Sat and was lying down in bed most of the time. Thankfully I was slightly well enough to do up the cake on the actual day. Happy Birthday T! I will get a "make-up" dinner after-all.


Ingredients/ Method:

Base
6 pieces of digestive biscuits (about 80g)
40g butter, softened

Filling
500g cream cheese, at room temperature
30g caster sugar
20g cornflour, sieved
200ml whipping cream
3 eggs, lightly beaten

A: zest of 1 lemon
juice of 1 lemon
1 tsp vanilla essence
9 pcs of oreo cookies, roughly crushed

B: 75g salted caramel dark chocolate, melted
1 tbsp cocoa powder, sieved

Chocolate ganache
100g dark chocolate bar (I used 85% cacao) 
25g butter
50g whipping cream
Decoration
1/3 cup whipping cream, whipped with 1/2 tbsp powder sugar
mini oreo cookies
salted caramel dark chocolate 


1. For base, crush the biscuits and mixed well with the butter. Press onto 7' loose base tin. Put into fridge until ready to use. Wrap outer tin with aluminium foil.
2. Preheat oven at 140 deg C.
3. Beat cream cheese, sugar and cornflour until smooth and creamy. Add in whipping cream. Lastly, add in eggs. Divide mixtue into 2 portions.
4. Stir ingredient (A) into one portion of cream cheese. Pour onto base and steam bake for 30 mins.
5. Stir ingredient (B) into one portion of cream cheese. Pour onto oreo layer which has baked through. Steam bake for another 30 mins.
6. Turn off oven and leave cake in oven with door closed for 30 mins.
7. Remove cake from oven and leave to cool completely. 
8. Melt dark chocolate bar, butter and whipping cream. Pour onto the chocolate cheese layer.
8. Cover cake and chill for at least 6 hours or overnight.
9. Remove cake from tin. Decorate as desired.

P.s The chocolate ganache is slightly too hard and should add more whipping cream the next time. The 85% dark chocolate is too bitter for most of them, to use a "sweeter" chocolate the next time.


Thursday, July 17, 2014

Durian cake & cream puffs

Now it's the durian season again and best time to bake a durian cake and cream puffs for my Aunt Ivy's birthday! Yummy cake, durian cream, cream puffs!


Vanilla sponge cake (makes a 6" round cake) 

Ingredients:
(A)
75g cake flour/superfine flour
1/4 tsp baking powder
1/8 tsp salt
5g milk powder

(B)
30g cooking oil
25g water
2 (38g) yolks
40g castor sugar
1/2 tsp vanilla extract

(C)
2 (75g) whites
45g castor sugar (original 50g)
1/8 tsp cream of tartar

Method
1. Sift ingredients (A) and put it aside
2. Whisk yolks and sugar till it turns lemon color
3. Add oil, water and vanilla and mix till well blended
4. Add ingredients (A) and mix it slowly till it forms a smooth batter
5. Whisk (C) till stiff
6. Fold in 1/3 of egg white mixture into egg yolk mixture and gently stir, then fold in the remaining egg white mixture and mix well gently
7. Pour batter into a lined 6" round cake tin
8. Bake in a preheated oven 180C for 25-30 mins or till it springs back when touched
9. Removed from oven and invert the cake on the wire rack until completed cooled.

10. Cut into 3 equal slices. 

Durian cream

3 cups whipping cream
1 tbsp icing sugar 
Durian pulps (approximately 3 durians) 
(Quantity enough to cream the 6" cake and for the cream puffs) 

1. Whisk the whipping cream with icing sugar. 
2. Mix in durian pulps. Keep some fresh durian pulps for assembling the cake. 

Assembly
1. Slice sponge cake into 3 layers.
2. Spread durian cream on the 1st layer and spoon some fresh durian pulps. Repeat the same for 2nd layer. 
3. Spread the top and sides of cake with the durian cream. 
4. Chill well before serving. 

Durian cream puffs (aka Pate a choux puffs)

(recipe adapted from Bisous A Toi, copied here for ready reference) 

Ingredients 
1 cup (250ml) water
115g unsalted butter, cut into cubes
2 tsp sugar
1/2 tsp salt
1 cup (140g) all purpose flour
4 large eggs

Glaze (optional)
1 large egg yolk
1 tsp whole milk 

Method:

  1. In a saucepan, add all ingredients except flour. Boil over medium high heat, stirring gently. 
  2. Once mixture begins to boil, add the flour all at once and stir rapidly with a spatula until the mixture forms a thick paste and pulls away from the sides of the pan. 
  3. Remove from heat and transfer to mixer bowl.
  4. Using mixer with paddle attachment, beat the mixture until slightly cool. Add in one egg at a time, making sure each one is completely incorporated before adding the next. 
  5. Prepare tray with baking sheet. 
  6. Transfer into piping bag with a small tip. Pipe puff about 1 inch in size , leaving 1/2 inch spacing between each puff. 
  7. (For puff with shiny glaze, brush the tops of puffs without letting the glaze drip down the sides, which will inhibit rising.)
  8. Bake a pre-heated oven 220 deg C for 25 to 30 mins, or until golden brown. Let the puffs rest in oven for 5 mins.
  9. Remove from oven and poke each puff in the side with a paring knife so that it releases its steam. Cool completely. 

Assembly
1. Slit the puffs and spoon durian cream.
2. Chill before serving. (I left them in the freezer for fast chilling and it turn out good too!)


Tuesday, March 18, 2014

Superhero vs Pocoyo

This is the 2nd time my baby and my niece has a joint birthday party. My baby is 7, and my niece is turning 2. Both are March babies (and me as well!) We had a BBQ party at my aunty A's place and thankfully the weather was very kind to us!

The theme of cake was chosen by my boy - he's into Superheroes now; and my niece's favourite cartoon is Pocoyo! Very importantly, my boy 'designed' the cake, and he's definitely very proud of it! Me too!


This is how the cake should look like.... 


This is how the cake actually turned out.... 


At the same time, I think I've found THE vanilla sponge cake recipe *yipee* Of course, this goes very well with my trusted Swiss meringue butter cream.

I'm copying the recipe here for easy reference. The original recipe is here. (I've halved the recipe to make a 6" round cake, baking time 25 to 30 mins). I've also found a good reference site for pan shape/ size/ baking time/ etc.

Vanilla Sponge Cake
Ingredients:
(A)
150g cake flour/superfine flour
1/2 tsp (2g) baking powder
1/4 tsp (1g) salt
10g milk powder

(B)
60g cooking oil
50g water
4 (75g) yolks
80g castor sugar
1 tsp vanilla extract

(C)
4 (150g) whites
90g castor sugar (original 100g)
1/4 tsp (1g) cream of tartar

Method
1. Sift ingredients (A) and put it aside
2. Whisk yolks and sugar till it turns lemon color
3. Add oil, water and vanilla and mix till well blended
4. Add ingredients (A) and mix it slowly till it forms a smooth batter
5. Whisk (C) till stiff
6. Fold in 1/3 of egg white mixture into egg yolk mixture and gently stir, then fold in the remaining egg white mixture and mix well gently
7. Pour batter into a lined 9" round cake tin
8. Bake in a preheated oven 180C for 35-40 mins or till it springs back when touched
9. Once cooked, removed from oven and invert the cake on the wire rack until completed cooled
10.Removed from mould and decorate it

I'm also submitting this post to Aspiring Bakers #40: Rainbow and Ombre Party! (March 2014) hosted by Cynthia of The Baking Biatch, at the following link.

Chocolate chips orange cupcake

This was baked for my baby's actual 7th birthday as it's still a school day for him. Wishing him healthy, happy, smart & smooth sailing as always! Baked with love <3 nbsp="" p="">


I'm copying the recipe here for ready reference. The original recipe is here.

Ingredients: (makes 12 cupcakes) 
25g corn oil
35g freshly squeezed orange juice
3 eggs (large), cold from fridge
95g caster sugar
100g Top flour or cake flour
1/4tp fine salt
1 orange rind
1/3 cup chocolate chips 

Method: 
  1. Mix corn oil and orange juices together, set aside
  2. Mix flour and salt together, sift them twice, set aside
  3. Remove eggs from the fridge, add into the mixing bowl, add in caster sugar, immediately beat it till pale, thick and fluffy (Use KA mixer with balloon whisk, 3mins at speed 8-9, 10mins at speed 4-5, 2mins at Speed 1-2, total time 15mins ).
  4. With mixer running at speed 1-2, add in orange rind, add flour spoon by spoon, then add in corn oil + orange juices, and chocolate chips, do not over mix. Remove mixing bowl, use a spatula to fold the batter till well combined.
  5. Pour batter in a lined 12 holes muffin pan until 90% full. Lightly tap on countertop twice to remove air bubbles.
  6. Bake at pre-heated oven at 170C for 25mins at middle rack.

Monday, March 17, 2014

喜羊羊cake

This is another birthday cake, especially made for my niece's 2nd birthday. It's especially special as this is our 1st time celebrating with her in Sg. Her favourite chinese cartoon is 喜羊羊 and I'm over-the-moon when she said "羊羊" upon seeing the cake!


Transformer Cake

Oh gosh, I've seriously neglected my blog this time. I guess I won't have much time to regularly update this blog any time soon, but as and when I can, I would like to chronicle some of my bakes and memories.

Transformer cake - 1st time trying out chocolate-transfer method. Rather satisfied with the result. This was for my nephew 5th birthday on 23 Sept 2013.


Monday, September 24, 2012

Land of Dinosaurs

When my boy celebrated his 5th birthday in early March with a Monopoly cake, I remembered my sister-in-law asking whether I know how to make a dinosaur cake for my little nephew. I told her then that I will practice how to make one for his 4th birthday. I wanted to try out using modelling paste as the usual fondant is too soft and can't hold its shape well. But I didn't have the time (or maybe too lazy to practice) prior to making the actual birthday cake. As usual, I relied on the internet and googled on "how to make dinosaur using fondant". I chanced upon my saviour, A Baked Creation - exactly what I'm looking for and there's even a step-by-step tutorial on making T-Rex & Stegosaurus. This was 4 days before the birthday party! Imagined the stress and anxiety if the cake flops and how disappointed the birthday boy would be ;(

It was a right choice to use modelling paste as the dinosaurs keep in shape, whereas my test-dinosaurs using fondant looked miserable. Alrighty, I can be more adventurous and creative in my future fondant figurines! Nevermind that I had to stay up till the wee hours for 2 days @@ and can't think straight!

Modelling Paste
Ingredients/ Method:
a) 200gm white marshmallows
2tbsp water
500gm icing sugar
2 tbsp Crisco shortening

b) 1 tsp Gum Tragacanth (can get it from Phoon Huat)

1. Put marshmallows with 2 tbsp water in a microwave-safe bowl. Microwave on high for 30 secs.
2. Stir marshmallows till they are fluffy using spatula. Add half the icing sugar and mix well.
3. Grease hands with shortening and knead the remaining icing sugar into the fondant.
4. Weigh 225gm of fondant with 1 tsp gum tragacanth and knead till well mixed.
5. Add colour gel to the modelling paste as desired.

Notes:
a. Keep fondant wrapped in cling wrap and store in ziploc or airtight container. Can keep up to 2 months.
b. Modelling paste turns hard fast so prepare it only when you are ready to use.

So presenting my Land of Dinosaurs, which I'm pretty satisfied with the outcome and of course the excitement from the birthday boy's face when he saw the cake was most rewarding! Happy blessed birthday to my cutsy nephew KH! Also special thanks to the 2 men in my house for throwing ideas on how the cake should be and placing the dinosaurs on the cake <3 p="p">


Monday, March 5, 2012

My boy turns 5!

Pardon my lack of update on this blog and though I still visit my favourite list of blogs, I seem to have lesser time to do so these days. Lesser time to bake as well. Hopefully I'll be freer come 2nd quarter of the year!

Today is an exceptional and joyous day, my boy turns 5 and he sure has grown and changed alot! Long before his birthday, he'd made many requests and threw ideas on how he wanted his celebration. Not one, but two parties; one with family members and another one in school. A Monopoly cake and an Angry Bird cake. Since AB cake is more readily available at the bakery, I did a Monopoly cake for the family celebration. I'd to bring out the Monopoly boardgame to mimick the details, not an easy feat since I had not been baking or playing with the fondant for a while :p And instead of name of places, my boy specifically and repeated reminded me that we should have our family members' name on the board. I'm pretty happy to know how much thoughts he put in for his party and everyone was pleasantly surprise to see their names on the cake. Even the peanut-butter cream for the chocolate-flavoured cake, which was an instant hit with the guests, was decided by the birthday boy. The at-least 3kg cake was 'wolfed' down and requests for 2nd servings/ 'ta-baoing' (packed) would made any baker a happy (wo)man.

My best wishes to my lovely darling to be ever so healthy, all-rounded and successful person. Not forgetting to have fun and smell the roses along the way <3<3<3


Here's some pictures on Zakris' Monopoly-themed 5th birthday party and cake.


With Feb's month Aspiring Bakers' deadline extended, I'm glad to be able to participate and therefore submitting this post to Aspiring Bakers #16: Fun with Fondant! (February 2012) hosted by Yvonne of iceamericanos.

Monday, March 21, 2011

Birthday brunch at Keppel Club

Yesterday, we invited our family members to the Peony Jade @ Keppel Club. The restaurant is open to the public and the weekend dim sum brunch is good value for money at $28++ for adults, $15++ for child 5-10 years old, and free for kids below 5. In addition, the environment is cool! and the place is not crowded probably because of the location. Good service and attentive service staff!

Here's a galore of some of the food we had tried. I didn't manage to take pictures of all food cos they were gone before I could snap them. Other good ones that are not here includes Steamed Meat Dumpling with hot & sour sauce, Beancurd Skin Roll with Prawn & Japanese Seaweed, Deep Fried Prawn Roll with Almond & Mayonaise, Stirred Fried Brocolli with Oyster Sauce.


**Die-die must try!

Soft & fluffy Bao


**Must try, 'wok-full' taste


**This looks plain, but it's very flavourful & fresh! Must try

Delicious & refreshing desert!


Can give this a miss.

Save your stomach for something else.


We were filled to the brim when we left the restaurant. Overall it's a good experience but I find that the desserts selection is limited and not impressive, except for the mango sago. If we could end our meal with a nice round of dessert, it would have been more perfect!

Have a good week ahead!