Showing posts with label cake. Show all posts

Thursday, October 9, 2014

Chocolate fudge yellow cake

This was the Chocolate fudge yellow cake which we had for our Saturday dinner. But because we were so full after our dinner, my lil boy decided to skip it, and T and me shared a slice.
I had baked this cake only because there were some egg yolks left-over, and it's quite an eye-sore to see the egg yolks sitting in the fridge. It will be a waste to throw them away either. Yes, this is a pure egg yolk cake!
As my cake doomed quite a fair bit, I was eating the "scraps" after trimming the cake. Comparing, I actually like the cake better on its own, without the frosting. It tasted like good ol' butter cake! T likes the chocolate frostings, and wished I had slabbed more (and more)! Yumz

Yellow Butter Cake
(Recipe adapted from Joy of Baking, but size reduced to 6" round cake)

Ingredients/ Method: 
150g cake flour, sifted
1 3/4tsp baking powder
1/4 tsp salt (I omit)
85g unsalted butter, room temperature (I used salted butter)
132.5g granulated white sugar (I reduced to 120g)
55g egg yolks, about 3 large egg yolk
120ml milk
1 tsp pure vanilla extract

  1. In a bowl, sift or whisk flour with baking powder and salt.
  2. Using electric mixer, beat the butter until soft and creamy (about 1 -2 mins).
  3. Gradually add sugar and beat until light and fluffy (about 3-5 mins).
  4. Add egg yolks in 2 batches, beating well after each addition. Scrape down the sides of the bowl as need.
  5. Add vanilla extract and beat until combined.
  6. With mixer on low speed, add 1/3 flour to batter, followed by 1/2 milk. Then 1/3 flour, remaining milk, and lastly remaining flour. Mix well with each addition.
  7. Transfer batter to lined cake pan.
  8. Bake in pre-heated oven at 180deg C for 35 - 40 mins, or until skewer inserted in centre of cake comes out clean.
  9. Place the cake on a wire rack to cool in the pan for about 10 minutes. Then invert the cakes onto a greased rack.
  10. Cool completely before frosting.

Chocolate Frosting
(Recipe adapted from Kitchen Corner, quantity halved for 6" round cake)

Ingredients/ Method: 
37.5g cocoa powder
93.5ml water
150ml evaporated milk (I used whipping cream)
75g sugar
1/4 tsp salt
3/4 tsp vanilla extract
1 1/2 egg yolks
45g corn flour
3/4 tsp instant coffee
45g butter

  1. Mix everything in a double boiler except butter and keep on stirring with a hand whisk until the mixture thickens.
  2. Lastly add in the butter until a smooth  and spreadable consistency.

Thursday, September 25, 2014

Tokyo banana roll

Recently I've been doing a lot of blog-hopping and my to-do list is getting longer and longer. Definitely I won't be able to bake or cook as fast as I bookmarked an interesting recipe. Often times, the 'old' bookmarked recipe get forgotten and the 'new' bookmarked recipe cut the line, like This one.


It looks like a straight-forward recipe and I have 2 over-ripen bananas in the fridge. I'm not fully satisfied with the end result as my custard cream turned out slightly runny, and the sponge cake looks kinda rough when I sliced into halves. That's why you will see that I've some brown banana rolls too.

I guessed if I've followed the originator steps 100%, I should be able to achieve a much better results for the sponge cake. As for the custard cream, I noticed that it was quite runny when cooking it, but thought it will solidify after cool which didn't change much eventually. I may have to add more corn starch the next time I prepare this (which won't be too long...hehehe).

I've copied the recipe here for ready reference. Or you can also watch this Youtube video on How to Make Tokyo Banana Roll  https://www.youtube.com/watch?v=D6wxd72vM_A&feature=youtu.be. 

Banana custard cream 

Ingredients/ method: 
100g banana, without skin
1 egg
1 tbsp corn starch
3 tbsp granulated sugar (I reduced to 2 tbsp)
150ml milk
a few drops of vanilla extract
  1. In a bowl, mash banana with a fork
  2. Add all other ingredients and mix well.
  3. Strain the mixture through the sieve into a saucepan. 
  4. Put on low, stir constantly, and stop the heat when the cream starts to thicken. Mix well with the remaining heat. Add a few drops of vanilla extract. Leave to cool completely.
  5. Transfer the cream into a pastry bag or into a dish covered tightly with plastic wrap. (Make sure the cream sticks to the plastic wrap to keep from drying out). Chill in the fridge. 
Sponge cake
Ingredients/ Method
2 eggs
50g superfine sugar
35g cake flour
20g milk, room temperature
  1. Beat eggs and sugar with whisk in a metal bow. Placed it over the pan of hot water and melt the sugar and warm them up to 40 deg C. (I did not measure the temperature. When the egg white is warm to touch by hand, and there's no sugar grains, it should be ready.) 
  2. With an electric mixer, beat the batter on high speed for about 5 mins until white and fluffy. Then on low speed, beat for about 2 mins to set the texture. 
  3. Sift in the flour and fold together with spatula for about 10 mins. 
  4. Add milk and fold together with spatula for about 50 times until combined. (For Steps 3 & 4 , I used my KA on speed 1.) 
  5. Spread the batter in a lined 9" square tin. Drop the pan lightly on the counter to raise the air bubbles out of the batter. 
  6. Bake at preheated oven 180 deg C for 11-12 mins or until lightly brown. 
  7. When it's done, drop the pan lightly to prevent shrinking. 
  8. Remove the sponge cake from the pan by lifting the wax paper and place it on a wire rack to cool.
  9. When the cake is cool, remove the parchment paper and place the sponge cake on the parchment paper with brown side up.
Assembly
  1. Cut the sponge cake into 4 squares. Then cut them by half horizontally (will have thin slices, about 0.2 inch).
  2. Place the cake on plastic wrap (with brown side up), pipe out the banana custard cream, roll and securely twist the ends like a candy.
  3. Serve chill. 

Wednesday, September 24, 2014

Rainbow cake

Another check on my to-do list ~ Rainbow cake! Looking at the cake itself makes one so happy lol.

I'm using my usual vanilla sponge cake recipe to make a 7-layers 4.5" round cake. I'm also using my now-favourite cream cheese frosting. Both the sponge cake and frosting turned out very good!


My frosting skills is still quite bad, so I've to create some "designs" to hide the flaws.


Vanilla Sponge Cake

Ingredients/ Method:
(A)
150g cake flour/superfine flour
1/2 tsp (2g) baking powder
1/4 tsp (1g) salt
10g milk powder

(B)
60g cooking oil
50g water
4 (75g) yolks
80g castor sugar
1 tsp vanilla extract

(C)
4 (150g) whites
90g castor sugar (original 100g)
1/4 tsp (1g) cream of tartar

(D)
Colour gel
  1. Sift ingredients (A) and put it aside
  2. Whisk yolks and sugar till it turns lemon color
  3. Add oil, water and vanilla and mix till well blended
  4. Add ingredients (A) and mix it slowly till it forms a smooth batter
  5. Whisk (C) till stiff
  6. Fold in 1/3 of egg white mixture into egg yolk mixture and gently stir, then fold in the remaining egg white mixture and mix well gently
  7. Divide batter equally into 7 portions and into individual small bowls. (I got about 90g for each portion, but I would reduce it to 60-70g the next time.)
  8. Add colour gels into batter and mix well gently, and not to deflate too much air bubbles.
  9. Pour batter into lined cake tin. (I used disposable aluminum foil-type 4.5" round tin as I don't have so many cake pans.)
  10. Bake in a preheated oven 180C for 10-12 mins or when skewer comes out clean when inserted to the centre of cake.
  11. Removed from oven and let cake cool in pan for 5 mins on wire rack.
  12. Remove cake from pan and let it cool completely on wire rack.
Notes:
  1. If using the same size 4.5" round tin and 7 layers, just need to prepare 2/3rd of this recipe. Alternatively, you can bake the balance 1/3rd batter as vanilla cupcakes.
  2. As my oven can only bake 4 small tins at a time, I mix the egg yolk mixture and egg white in 2 batches.
  3. I used toothpick when adding and mixing colours to the batter, and using a small spatula to give a last few folds to ensure colours are evenly mixed.
  4. Insert straws to hold the cake, especially when this cake base is small and pretty tall. 
Cream cheese frosting
250g cream cheese
170g unsalted butter, softened
70g icing sugar, sieved
1 tsp vanilla extract
  1. Using an electric mixer on medium-high speed, beat butter and cream cheese until fluffy, about 2 to 3 minutes.
  2. Reduce speed to low. Add sugar in three batches, then add vanilla and mix till smooth and combined, scraping down sides of bowl as needed. (If not using immediately, frosting can be refrigerated up to 3 days in airtight container. Before using, bring to room temperature and beat on low speed until smooth again.)

Tuesday, September 23, 2014

Superman 2-tier cake

Another birthday cake for my nephew 6th birthday!
 

Instead of the usual chocolate cake base, I found another similarly good one which was used by Jane in her salted caramel cake.


Chocolate cake 
(recipe adapted from Passionate About Baking, originally from Martha Stewart)

Ingredients/ Method
375g plain flour
380g castor sugar
129g unsweetened dutch-processed cocoa powder
1 tbsp baking soda
1 1/2 tsp baking powder
1 1/2 tsp coarse salt
4 large eggs
368g buttermilk (or 366g whole milk with 1 1/2tsp lemon juice, mix well and let it sit for 5 mins)
90g warm water
137g vegetable oil
2 tsp vanilla extract
  1. In a bowl, sift flour, sugar, cocoa powder, baking soda, baking powder and salt. Beat on low speed until just combined.
  2. Add eggs, buttermilk, warm water, oil and vanilla extract and beat on medium speed, until smooth. Takes about 3 mins.
  3. Pour batter equally into two 9" lined round cake pans. 
  4. Bake on pre-heated oven 180 deg C for about 35-40 mins, or until skewer inserted into centre of cake comes out clean. 
  5. Let cake cool in pans on a wire rack for 15 mins. 
  6. Remove cake from pans onto wire rack, and let cool completely. 

Monday, September 22, 2014

Avocado bundt cake

A recipe that I've bookmarked for a while but only managed to try out recently. Instead of p seeds, I've replaced it with chia seeds. Similarly to Edith, I also did not get the green hue from avocado although I tried to puree the avocado just before using it.

The avocado taste is not evident but still the cake is good especially when they are warm and the chia seeds give the cake a slightly crunchy bite. With avocado as fats replacement and chia seeds added, this is definitely a healthier version of cake-without-guilt.
Avocado cake
(recipe from Rumbling Tummy, originally from Food Me Over)

Ingredients/ Methods
50g unsalted butter
125g small avocado
180g caster sugar
4 eggs, separate
100g plain flour
50g chia seeds
50g almond flour
2 tsp baking soda
2 tbsp lemon juice
  1. Puree avocado with lemon juice until creamy. 
  2. Beat butter and sugar until creamy. 
  3. Add avocado puree to butter/ sugar mixture and beat until creamy. 
  4. Add egg yolk , one at a time, until well combined.
  5. Fold in sifted flour and baking powder, almond flour and chia seeds to the mixture. 
  6. In a separate bowl, whisk egg white with a pinch of salt, till stiff. 
  7. Gently fold into egg yolk batter. 
  8. Pour into greased pan and bake in pre-heated oven 160 deg C for 50 mins. 

Monday, September 15, 2014

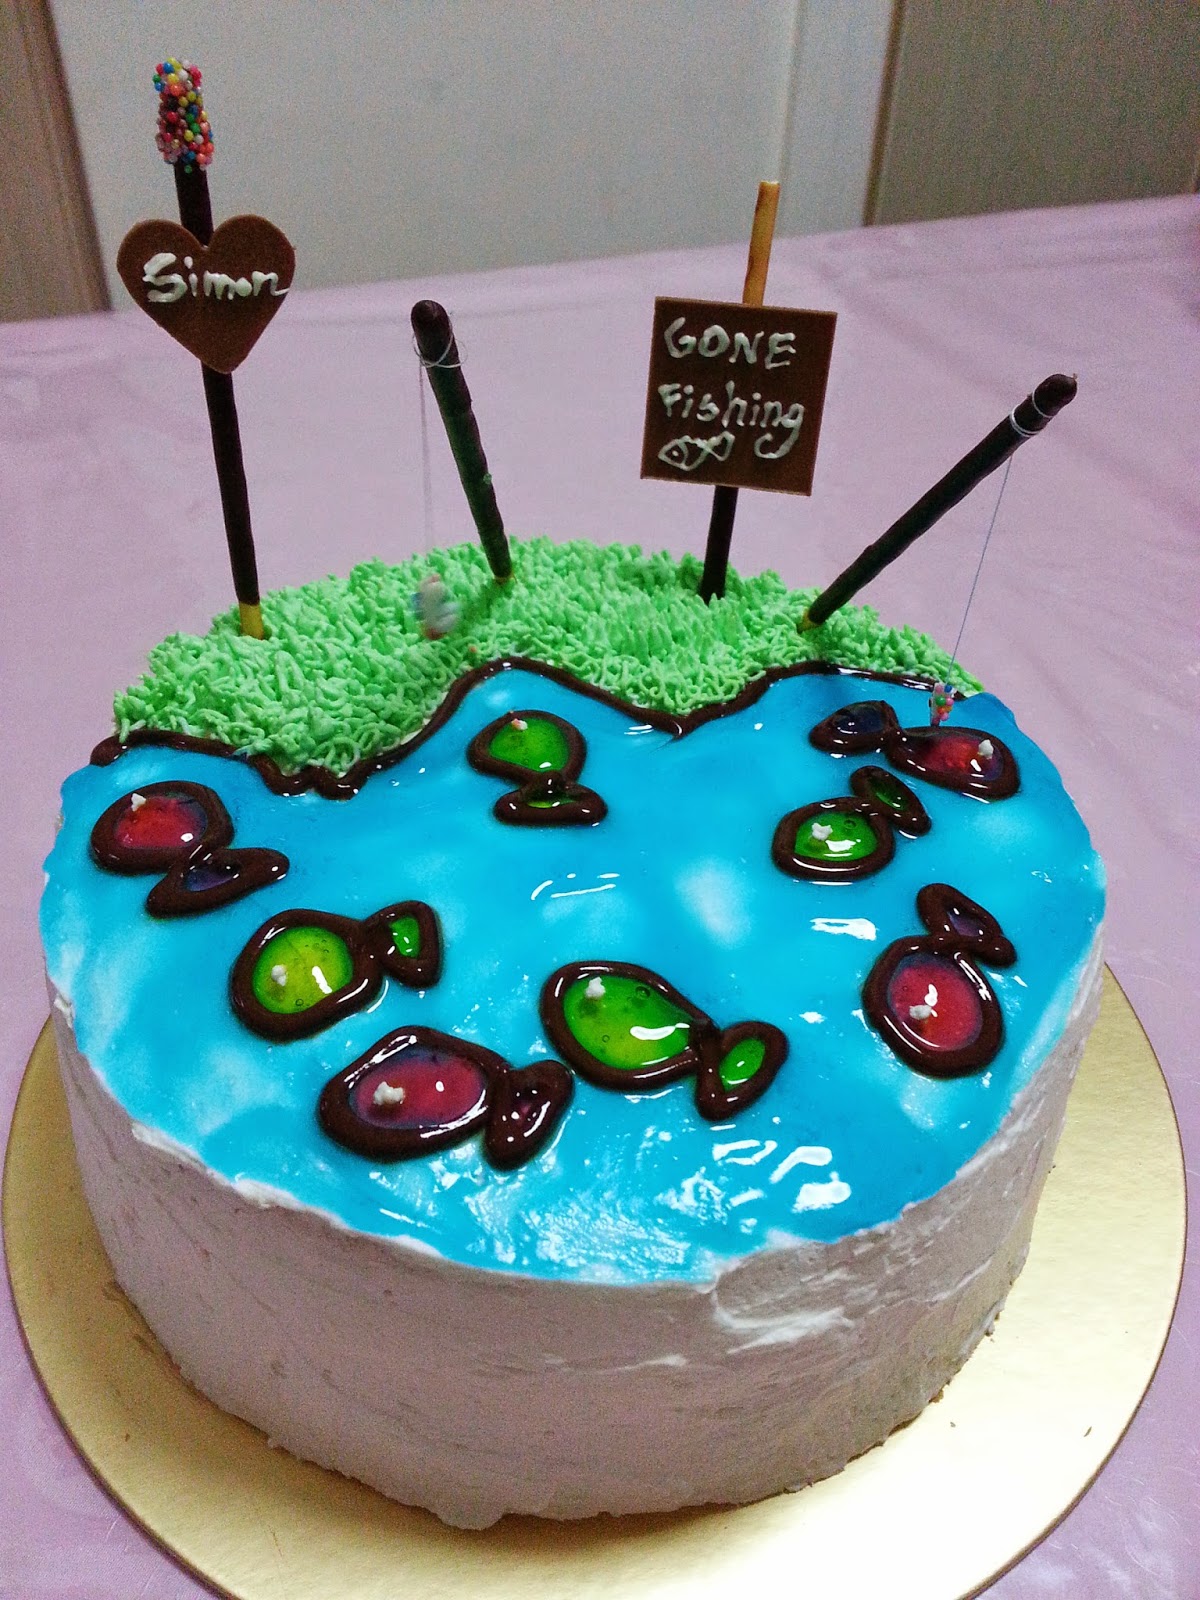
Gone fishing! cake


This Gone fishing! cake was prepared especially for my uncle Simon, after knowing that he likes playing with the fishing game on mobile! Although I was very happy with the design of the birthday cake, the texture of the cake was slightly on the dry side. I'm using my earlier successful vanilla sponge cake base. Mistake 1: the cake was not thoroughly baked at 33 mins, and I gave it a couple more minutes (a minute too many) and turn it to fan-oven; Mistake 2 - wanted to slice the 8' round cake into 3 even slices, but end up slicing up to 2 uneven thickness.


Tuesday, August 26, 2014

Purple plum torte

I had 5 purple plums and some other fruits sitting in the kitchen last week, and I knew that I'm going to bake something with the more perishable plums first. By the time I'm into my baking mode, there were only 3 purple plums left. And I'd to bake it into a much smaller cake for our small family of 3, instead of our usual extended family of 10ish folks.

We had it for our breakfast, and once again my little supporter gave a thumbs up!
Bb: How did you make the cake?
Me: It's very easy to make this...
Bb: Why is it that it's so easy to make but it taste so delicious!
Me: Maybe 'cos it's a good recipe...


Purple plum torte
(recipe adapted from Smitten Kitchen, below is half the original recipe with minor adjustments)

Ingredients/ Method:
63g plain flour
1/2 tsp baking powder
a pinch of salt
75g caster sugar (reduced from 100g)
60g unsalted butter, softened
1 large egg
3 purple plums, halved and pitted

Streusel topping 
1 tsp fresh lemon juice (I omitted this)
1 tbsp caster sugar
1/2 tsp ground cinnamon

  1. Sift flour, baking powder and salt in a bowl. Set aside.
  2. With a electric mixer, cream butter and sugar until fluffy and light in colour.
  3. Add egg and continue mixing, scraping down the bowl. 
  4. Add dry ingredients and mix till combined. Do not overmix. 
  5. Pour batter into lined 6" round cake tin and smooth the top. (SK used ungreased 9" springfoam pan.) Arrange the plums, skin side up, all over the batter. 
  6. Mix caster sugar and cinnamon and sprinkle on top of the plums and batter. (SK sprinkled the top with lemon juice, then cinnamon and then remaining sugar.) 
  7. Bake in pre-heated oven 180 deg C for 35 mins, or until the skewer inserted comes out clean. 
  8. Cool on rack and remove from pan when completely cool. 
  9. Chill the cake in fridge overnight, or leave it covered at room temperature overnight as the cake is even better on second day when the plum juice further releases into the cake. 


This post is linked to the event Little Thumbs Up (August 2014 Event: Flour) - organised by Bake for Happy Kids and My Little Favourite DIY, and hosted by Diana from Domestic Goddess Wannabe.


Wednesday, August 13, 2014

Pandan rice flour mini sponge cake


With some left-over pandan coconut milk from the earlier baking of chiffon cake, I wanted to bake something simple and easy. These will be for our tea-time and tomorrow's breakfast.


 Pandan rice flour mini sponge cake
Ingredients/ Method

3 eggs
75g sugar
65g cake flour, sifted
35g rice flour, sifted
40ml Pandan coconut milk
20g corn oil
1/8 tsp salt


  1. Preheat oven to 170 deg C.
  2. Boil pandan coconut milk, oil and salt in a small pot over low fire, till few bubbles start to appear on the surface. Set aside to cool. 
  3. In a cake mixer, beat eggs and sugar until pale and thick.
  4. Add in flour and mix till combined, either using mixer on low speed or using spatula. Do not over mix. 
  5. Add in pandan coconut milk into batter and mix well. Do not over mix. 
  6. Using ice-cream scoop, fill up lined mini cupcake holders with batter upto 90%. 
  7. Bake for 15 mins at 170 deg C. Remove and let cool on wire rack. 


I did some doodlings using 2 tbsp of batter and 1 tsp of cocoa powder, mix well. I used the cake tester to draw on the mini sponge cakes. These are specially reserved for my lil boy! 


This post is linked to the event Little Thumbs Up (August 2014 Event: Flour) - organised by Bake for Happy Kids and My Little Favourite DIY, and hosted by Diana from Domestic Goddess Wannabe.


Friday, August 1, 2014

Red velvet cupcake

A yummilicious pretty cake!


Previously I had reservations on baking red velvet cake as I thought alot of colouring went in there. However that changed after I had a very good RVC and when I saw The Sunday Times' Life Style section featuring a red velvet chiffon cake recipe just last week, I was very tempted to try it. Too much colouring once in a while should be ok, isn't it? I also used the cream cheese recipe from Jane and it's finger-licking good ;) All my guinea pigs gave 2-thumbs up for this cake and the cream, I guess it's a keeper!


Red velvet cake
(yields about 21 cupcakes)

Ingredients/ Method: 

2 tbsp cocoa powder
70g hot water
40g milk
50g unsalted butter
1/4 tsp salt
1 tsp vanilla extract
1 1/4 tsp red colouring powder (or 1 1/2 tsp red colouring paste)
90g cake flour
5 egg yolks

5 egg whites
100g caster sugar (reduced from 110g)

  1. Dissolve the cocoa powder in hot water. 
  2. In a small pot over low heat, warm the milk, butter, salt and cocoa mixture to about 60 deg or until the butter melts completely. 
  3. Add the vanilla extract and red colouring powder. Stir and mix well. Remove from heat. 
  4. In a large mixing bowl, add the flour and cocoa mixture and whisk thoroughly. 
  5. Add egg yolks one at a time whilst whisking the mixture. Set aside. 
  6. Whisk egg whites in a mixing bowl. When they turn foamy, add sugar teaspoon by teaspoon. Whisk till stiff peak.
  7. Fold in 1/3 egg white to the red velvet batter using a spatula. When the mixture is just combined, add another 1/3 egg whites and repeat until all egg whites are incorporated. 
  8. Using ice-cream scoop, fill up cupcake liners upto 3/4 full.
  9. Bake at pre-heated oven at 170 deg C for 20-25 mins. 
P.s. Original recipe is for 20 cm chiffon cake. Bake at 170 deg C for 10 mins before reducing temperature to 150 deg C for another 35 mins.

Cream cheese frosting
(recipe reference from Jane, and adapted from Martha Stewart) 

125g cream cheese
85g unsalted butter, softened
35g icing sugar, sieved
1/2 tsp vanilla extract
  1. Using an electric mixer on medium-high speed, beat butter and cream cheese until fluffy, about 2 to 3 minutes. 
  2. Reduce speed to low. Add sugar in three batches, then add vanilla and mix till smooth and combined, scraping down sides of bowl as needed. (If not using immediately, frosting can be refrigerated up to 3 days in airtight container. Before using, bring to room temperature and beat on low speed until smooth again.)
The cake is good served chilled. 


This post is linked to the event Little Thumbs Up (August 2014 Event: Flour) - organised by Bake for Happy Kids and My Little Favourite DIY, and hosted by Diana from the Domestic Goddess Wannabe.


Thursday, July 31, 2014

Salted caramel & oreo cheesecake

This was a birthday cake baked at the last minute as I was not feeling well over the weekend. I've planned to bake this cheesecake long ago and I was even hesitating to present it as a belated birthday cake. Unfortunately I was not able to attend the birthday dinner on Sat and was lying down in bed most of the time. Thankfully I was slightly well enough to do up the cake on the actual day. Happy Birthday T! I will get a "make-up" dinner after-all.


Ingredients/ Method:

Base
6 pieces of digestive biscuits (about 80g)
40g butter, softened

Filling
500g cream cheese, at room temperature
30g caster sugar
20g cornflour, sieved
200ml whipping cream
3 eggs, lightly beaten

A: zest of 1 lemon
juice of 1 lemon
1 tsp vanilla essence
9 pcs of oreo cookies, roughly crushed

B: 75g salted caramel dark chocolate, melted
1 tbsp cocoa powder, sieved

Chocolate ganache
100g dark chocolate bar (I used 85% cacao) 
25g butter
50g whipping cream
Decoration
1/3 cup whipping cream, whipped with 1/2 tbsp powder sugar
mini oreo cookies
salted caramel dark chocolate 


1. For base, crush the biscuits and mixed well with the butter. Press onto 7' loose base tin. Put into fridge until ready to use. Wrap outer tin with aluminium foil.
2. Preheat oven at 140 deg C.
3. Beat cream cheese, sugar and cornflour until smooth and creamy. Add in whipping cream. Lastly, add in eggs. Divide mixtue into 2 portions.
4. Stir ingredient (A) into one portion of cream cheese. Pour onto base and steam bake for 30 mins.
5. Stir ingredient (B) into one portion of cream cheese. Pour onto oreo layer which has baked through. Steam bake for another 30 mins.
6. Turn off oven and leave cake in oven with door closed for 30 mins.
7. Remove cake from oven and leave to cool completely. 
8. Melt dark chocolate bar, butter and whipping cream. Pour onto the chocolate cheese layer.
8. Cover cake and chill for at least 6 hours or overnight.
9. Remove cake from tin. Decorate as desired.

P.s The chocolate ganache is slightly too hard and should add more whipping cream the next time. The 85% dark chocolate is too bitter for most of them, to use a "sweeter" chocolate the next time.


Wednesday, July 30, 2014

Yoghurt blueberry cake

When I saw Anncoo's post on Yoghurt blueberry cake (and her many other recipes), I just can't help but to bake them right away! Her cake looks so pretty & dainty :)

Just like what she has mentioned, the cake really tasted like cheesecake, light and moist. We had it chilled and I made some blueberry sauce with the leftover blueberries - about half a punnet, and drizzled on the cake. Our Saturday breakfast before Z's swimming class!


I'm copying the recipe here for easy reference, original recipe is here.

Yoghurt blueberry cake

(makes a 6" round cake)

Ingredients/ Method:
3 egg yolks (70g each)
120g natural yoghurt, room temperature
20g whipping cream
35g butter, melted
1/2tbsp lemon juice
30g plain flour
15g corn flour
3 egg white
50g caster sugar
fresh blueberries

  1. Combine yoghurt and melted butter together, stir till smooth with a hand whisk. 
  2. Add in whipping cream and egg yolks, mix well. 
  3. Sieve in plain flour and corn flour, mix till smooth.
  4. Whisk egg whites till foamy and add sugar in 3 batches. Whisk till stiff peak. 
  5. Fold egg whites in 3 batches to the yoghurt mixture until well incorporated. 
  6. Pour half of the batter into a 6" lined round cake pan and place some blueberries on it. Pour the remaining batter over it.
  7. Place some blueberries on top of the batter.
  8. Place the cake pan into bain-marie, a pan with water half way up the sides of the pre-heated oven 150 Deg C for 60 to 70 mins. 
  9. Place the cake pan at the lowest level in the oven.
  10. Leave cake in pan to cool completely before removing. 
  11. Chill the cake before serving. 

Blueberry sauce

Ingredients/ Method: 

fresh blueberries (half a punnet)
about 3 tbsp sugar (depends on your liking on sweetness)

  1. Using fork, roughly squashed the fresh blueberries in a small pot. 
  2. Cook the blueberries and sugar on low heat and stir continuously. 
  3. The sauce is ready when the juice is reduced and the mixture looks "thick and syrupy".
  4. Leave to cool and keep in clean container. 
  5. Keep refrigerated. 


Thursday, July 17, 2014

Chocolate cheddar cheesecake

I've made a couple of cheddar cheesecakes using this original recipe, and had modified it to orange-flavoured one before. Thinking it would be quite straight forward to make it into a chocolate version, but it resulted to something quite different. At first glance, it looks like the Magic Custard Cake, which I've bookmarked but yet to try. Without making comparison to the original cheddar cheesecake and to eat this cake on its own merit, I would say it's pretty good. 


Chocolate cheddar cheesecake

(makes a 8" x 8" square pan) 

Ingredients:
6 slices of Cheddar Cheese
100ml fresh milk
100g unsalted butter
6 egg yolks
6 egg whites (preferably cold, place in fridge after separating)
100g caster sugar

75g cake flour
25g cocoa powder 

Method: 

  1. In a heatproof saucepan, place the butter, fresh milk and tear up the cheddar chesee slices in. 
  2. Place saucepan over medium low heat and stir gently until all is melted and mixed in together. Set aside for 5 minutes to cool before use. 
  3. Ladle big spoonful of the milk mixture into the egg yolks. Mix well and then add in the rest of the milk mixture in. Stir well. 
  4. Sift in the cake flour and cocoa powder into the egg yolk mixture and make sure no lumps. 
  5. Preheat the oven to 155 deg C with a water bath. 
  6. Grease and line an 8x8 square baking pan. 
  7. In another large mixing bowl, add the egg whites in and beat till foamy. Add in the sugar gradually and beat till stiff peaks. 
  8. Gently fold in 1/3 of the egg whites portion into the cheese mixture. And repeat with the other 2 portions and careful not to deflate it.
  9. Pour the batter into the prepared pan and smooth out the surface. 
  10. Bake the cake in the oven for 50 minutes or till the tester comes out clean.
  11. Chill the cake before serving. 

Durian cake & cream puffs

Now it's the durian season again and best time to bake a durian cake and cream puffs for my Aunt Ivy's birthday! Yummy cake, durian cream, cream puffs!


Vanilla sponge cake (makes a 6" round cake) 

Ingredients:
(A)
75g cake flour/superfine flour
1/4 tsp baking powder
1/8 tsp salt
5g milk powder

(B)
30g cooking oil
25g water
2 (38g) yolks
40g castor sugar
1/2 tsp vanilla extract

(C)
2 (75g) whites
45g castor sugar (original 50g)
1/8 tsp cream of tartar

Method
1. Sift ingredients (A) and put it aside
2. Whisk yolks and sugar till it turns lemon color
3. Add oil, water and vanilla and mix till well blended
4. Add ingredients (A) and mix it slowly till it forms a smooth batter
5. Whisk (C) till stiff
6. Fold in 1/3 of egg white mixture into egg yolk mixture and gently stir, then fold in the remaining egg white mixture and mix well gently
7. Pour batter into a lined 6" round cake tin
8. Bake in a preheated oven 180C for 25-30 mins or till it springs back when touched
9. Removed from oven and invert the cake on the wire rack until completed cooled.

10. Cut into 3 equal slices. 

Durian cream

3 cups whipping cream
1 tbsp icing sugar 
Durian pulps (approximately 3 durians) 
(Quantity enough to cream the 6" cake and for the cream puffs) 

1. Whisk the whipping cream with icing sugar. 
2. Mix in durian pulps. Keep some fresh durian pulps for assembling the cake. 

Assembly
1. Slice sponge cake into 3 layers.
2. Spread durian cream on the 1st layer and spoon some fresh durian pulps. Repeat the same for 2nd layer. 
3. Spread the top and sides of cake with the durian cream. 
4. Chill well before serving. 

Durian cream puffs (aka Pate a choux puffs)

(recipe adapted from Bisous A Toi, copied here for ready reference) 

Ingredients 
1 cup (250ml) water
115g unsalted butter, cut into cubes
2 tsp sugar
1/2 tsp salt
1 cup (140g) all purpose flour
4 large eggs

Glaze (optional)
1 large egg yolk
1 tsp whole milk 

Method:

  1. In a saucepan, add all ingredients except flour. Boil over medium high heat, stirring gently. 
  2. Once mixture begins to boil, add the flour all at once and stir rapidly with a spatula until the mixture forms a thick paste and pulls away from the sides of the pan. 
  3. Remove from heat and transfer to mixer bowl.
  4. Using mixer with paddle attachment, beat the mixture until slightly cool. Add in one egg at a time, making sure each one is completely incorporated before adding the next. 
  5. Prepare tray with baking sheet. 
  6. Transfer into piping bag with a small tip. Pipe puff about 1 inch in size , leaving 1/2 inch spacing between each puff. 
  7. (For puff with shiny glaze, brush the tops of puffs without letting the glaze drip down the sides, which will inhibit rising.)
  8. Bake a pre-heated oven 220 deg C for 25 to 30 mins, or until golden brown. Let the puffs rest in oven for 5 mins.
  9. Remove from oven and poke each puff in the side with a paring knife so that it releases its steam. Cool completely. 

Assembly
1. Slit the puffs and spoon durian cream.
2. Chill before serving. (I left them in the freezer for fast chilling and it turn out good too!)


Monday, April 14, 2014

Passionfruit butter cake

I'm trying to getting into the good habit of baking for our daily breakfast.


Passionfruit butter cake 
(yield 9X5" loaf tin)

Ingredients/ Method:
250g self raising flour, sifted
250g good quality unsalted butter, softened
185g castor sugar (I reduced it to 170g)
170g whole eggs, at room temperature (about 3 eggs)
100ml passionfruit juice (Only left with 2 passionfruit and yield 55gm juice, so added 45ml milk) 

1) Preheat oven to 180 deg C. Prepare lined loaf tin and set aside.
2)In a large mixing bowl, cream the butter and sugar on medium high speed for about 5 mins until pale and fluffy.
3) Add beaten eggs to butter mixture in 6 additions, ensuring that each addition is well incorporated before adding the next addition.
4) Add 1/3rd of flour to the egg-butter mixture on low speed till well incorporated. Next add in passionfruit juice to batter till well incorporated.
5) Add another 1/3rd of flour to the batter till well incorporated. Add the milk and mix till well incorporated. Lastly add the remaining flour into the batter and mix till well incorporated.
6) Scrape the side and bottom with a spatula for any loose ingredients.
7) Bake for about 50-60 min at 180 deg C.
8) Check doneness when skewer come out clean after inserted into cake.
9) Allow cake to cool completely on wire rack.