Monday, March 21, 2011

Cinnamon Buns

I've been meaning to bake my own Cinnamon Buns for ages but never get to do it so far. Recently, there are few bloggers who 'tempted' me again with their hot-from-oven cinnamon buns, you can see from Reese Kitchen, Do What I Like. With some time to spare today, I finally get to bake these delicious cinnamon buns. It is so easy and I'm wondering why I took so long to bake it.

I was enjoying the entire process - from preparing the ingredients to cooking the water roux to mixing the dough and proofing, and rolling, cutting. Not too sure whether am I the only one, but I like the smell of yeast, it totally lift up my spirits! Seeing the 1st and 2nd successful proofing made me super uber happy!


Before 2nd proof.

40 mins later... after 2nd proof

When the buns are fresh out of the oven (almost immediately cos I'm running late on schedule -again!), I grabbed one of them, snapped a few pictures and rushed out of the house. I was munching the bun whilst walking to the bus-stop.


Cinnamon Buns (65 deg C Tangzhong method)
(Recipe adapted and slightly modified from Kitchen Corner)

Water Roux (Tangzhong)
125g water
25g bread flour

1. Cook 125g water with 25g bread flour at medium low heat, keep stirring until becomes thicken and no lumps left. Cook until 65 deg C, or if you do not have a thermometer, cook until mixture resembles baby porridge.
2. Transfer to clean bowl and cover with cling wrap to prevent skin forming.
Note: Water roux can be stored for 2 days, and if colour turn dark grey, to discard.

Dough
(A) 210g bread flour
56g plain flour
20g milk powder
42g sugar
1/2 tsp salt
6g instant yeast

(B) 30g eggs
85g water
84g water roux (refer to water roux recipe as above)

(C) 22g butter

(D) 15g butter, soften
30g brown sugar
1 tablespoon cinnamon powder

1. Put all the ingredients (A) and (B) and knead until it form a dough.
2. Add the butter little by little and continue the kneading process until smooth and elastic and the dough does not stick at the side of the mixing bowl.
3. Proof for 40 minutes in a clean bowl cover with cling wrap.
4. Mix brown sugar and cinnamon powder until well combine. Set aside.
5. Flatten the dough with your hand and roll it out in longish shape with a rolling pin about 25cm x 40cm.
6. Brush butter on the surface of the dough then sprinkle cinnamon-sugar mixture onto the dough evenly.


7. Roll it up like a swiss roll and seal it tightly.
8. Cut into 8 equal portions using lightly floured knife.
9. Place dough in a 9" round cake tin and cover with a cling wrap. Proof for a further 40 minutes. 10. Bake at 180 deg C preheated oven for 15 minutes.


It turned out cottony soft and yummy, and simply easy to churn out. Sweetness is just nice so there is no need to reduce the brown sugar. But if you like sweeter cinnamon buns, more sugar has to be added.


Enjoy over a cup for black coffee - heavenly!

Birthday brunch at Keppel Club

Yesterday, we invited our family members to the Peony Jade @ Keppel Club. The restaurant is open to the public and the weekend dim sum brunch is good value for money at $28++ for adults, $15++ for child 5-10 years old, and free for kids below 5. In addition, the environment is cool! and the place is not crowded probably because of the location. Good service and attentive service staff!

Here's a galore of some of the food we had tried. I didn't manage to take pictures of all food cos they were gone before I could snap them. Other good ones that are not here includes Steamed Meat Dumpling with hot & sour sauce, Beancurd Skin Roll with Prawn & Japanese Seaweed, Deep Fried Prawn Roll with Almond & Mayonaise, Stirred Fried Brocolli with Oyster Sauce.


**Die-die must try!

Soft & fluffy Bao


**Must try, 'wok-full' taste


**This looks plain, but it's very flavourful & fresh! Must try

Delicious & refreshing desert!


Can give this a miss.

Save your stomach for something else.


We were filled to the brim when we left the restaurant. Overall it's a good experience but I find that the desserts selection is limited and not impressive, except for the mango sago. If we could end our meal with a nice round of dessert, it would have been more perfect!

Have a good week ahead!

Sunday, March 20, 2011

Lemon Meringue Cake

Today's my birthday and it started with a long day but wonderful and lovely with lots of people closest to me. Before the DAY, I was busy preparing a birthday cake for myself and ended till the wee hours. Although I had in mind a cake to make, I was deliberating whether to bake or not to bake. Ended up I started baking preparation late in the night (like 9.30pm). So I was practically still baking the cake when the clock striked twelve i.e. on my birthday! And the cake was only frosted in the morning, just before the time we were supposedly to leave the house and picked up my family members for brunch! I was rushing. TL commented that I must have rushed to come to this world. Period.

Being a super inefficient and bad planner me, this was a tedious birthday cake to make. If any other bakers were to see me in this state, they would probably looked in exasperation. One thing for sure, I can't bake for a living, hah!


Anyway, whilst planning for my own birthday cake, I was flipping the new recipe book I got last month - "My Birthday Cake" by Kevin Chai. The pictures are all alluring but I finally decided on a Lemon Meringue Cake because I was left with 3 lemons sitting in the fridge for ages. Ironically, I did not followed the recipe in the book, the final cake was an assembly of various recipes.

Lemon Curd
(Recipe adapted from The Little Teochew)

60g unsalted butter
200g sugar
2 eggs + 2 egg yolks
120ml fresh lemon juice (from 2.5 lemons)
1 tsp grated lemon zest, or more if you like (depending on how strong you want the flavour of lemon)

1. In a large bowl, whisk all the ingredients except the butter*. Mix well. Place the bowl over a bain-marie** (water bath) and stir constantly. The mixture may look curdled, but it will smooth out as it cooks.
2. If you want a more subtle taste of lemon, do not add the zest at this stage. Set aside with the butter.
3. Once the mixture thickens - it should leave a path on the back of a spoon - turn off the flame and add butter in 2 or 3 additions. If you have not added in your lemon zest, add it in now and stir to mix well.
4. Allow the curd to cool slightly before transferring to a clean jar or bowl. Strained the curd to get a smooth curd. Make sure it is covered to prevent a skin from forming. Chill in the refrigerator. The curd will thicken further as it cools. Covered tightly, it will keep in the refrigerator for a week and in the freezer for 2 months.

Genoise Cake Batter
(Recipe adapted, doubled and slightly modified from Honey Bee Sweets)

86g clarified butter (or unsalted butter)
1 tsp vanilla bean paste
2 large eggs + 1 egg yolk (100g + 18g)
100g caster sugar
66g cake flour
66g corn flour

1. Preheat the oven to 175C.
2. To prepare the butter, in a microwavable bowl, warm the butter until hot. Stir in the vanilla bean paste, cover and keep warm.
3. To prepare the egg mixture; in the bowl of a stand mixer set over a pan of simmering water, heat the eggs, yolk, and sugar until just lukewarm to the touch, stirring constantly with a long handled whisk to prevent curdling.
4. Immediately remove the bowl to the stand mixer and attach the whisk beater. Beat on high speed for a minimum of 5 minutes. It will more than quadruple in volume and very thick and airy.
5. Remove almost 1/2 cup of the beaten egg mixture and whisk it thoroughly into the melted butter.
6. Sift about half of the flour over the remaining egg mixture, fold it in gently but rapidly until almost all the flour has disappeared. Repeat with the remaining flour until all traces of the flour have disappeared.
7. Fold in the butter mixture until just incorporated. Make sure you reach into the bottom of the pan to be sure to moisten all the flour.
8. Pour the batter into the prepared 7" cake tin.
9. Bake for about 30 minutes, or until golden brown and the skewer inserted into the cake came out clean.
Note: To prevent the collapse of its delicate foam structure, while still hot, the genoise must be unmould as soon as it is baked.

Meringue
(Recipe adapted from My Birthday Cake by Kevin Chai)

70g egg whites
60g caster sugar (reduced from 70g)
40g ground almond
25g dessicated coconut
10g plain flour

1. Beat egg whites until soft peaks form.
2. Gradually add in sugar, continue beating until stiff peaks form.
3. Combine ground almond, dessicated coconut and flour, and fold into egg white mixture.
4. Spread meringue onto 2 sheets of 7" diameter of round greaseproof paper.
5. Bake at 170 deg C for 25 mins or until golden brown.

Crystallized Lemon
(Recipe adapted from My Birthday Cake by Kevin Chai)

Half a lemon (sliced) - this is what I had left
50g caster sugar
25ml water

1. Bring sugar and water to boil.
2. Add in lemon slices and continue to cook on low heat until sugar thickens.
3. Remove and leave to cool.

Lemon Curd Cream
1 cup whipping cream
Slightly more than 1/4 cup lemon curd

1. Whisk whipping cream until stiff peak.
2. Add in lemon curd into whipped cream and continue to beat at low speed until well combined.
3. Stored in fridge until ready to use.

Assemble the Cake

  1. Slice the cake into 3 portions.
  2. Spread lemon curd cream onto a slice of cake and sandwich with meringue.
  3. Continue step (2) and cover with another slice of cake.
  4. Coat the entire cake with remaining cream.
  5. Decorate crystallized lemon slices onto the cake.
  6. Pipe lemon curd on the cake in any design.


Unfortunately, the genoise sponge cake did not work for me this time and I strongly believe it's because I didn't manage the techniques required. The texture was densed although not dry. I must work very hard to get THE sponge cake. Overall, the combination of lemon curd/cream, genoise sponge cake and meringue is a twist to a conventional cake, rather refreshing I would say. As usual, my family members are very supportive and finished up the cake!


I'm submitting this to Aspiring Bakers #5: Fruity March hosted by Jess of Bakericious.


Saturday, March 12, 2011

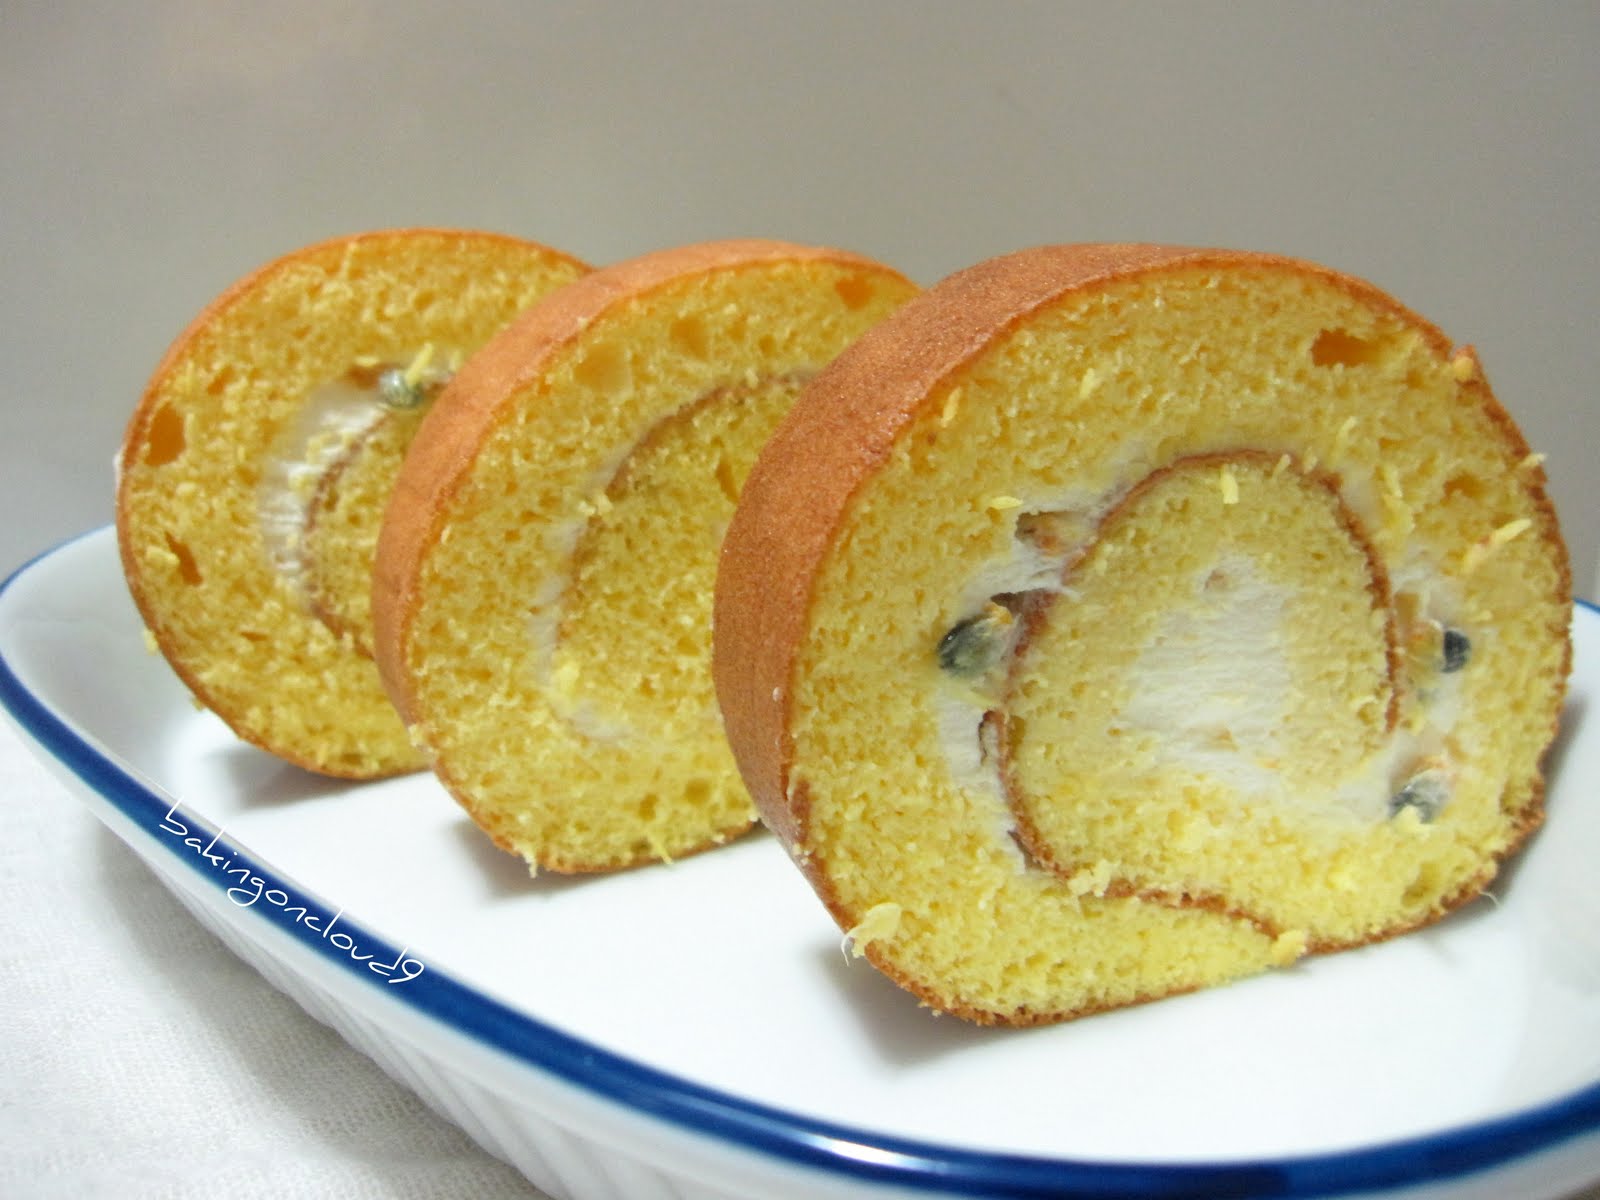
Passionfruit Swiss Roll

This week has not been a good week for me. I'd not been feeling well since last weekend after Zak's birthday celebration. First came the body ache and fever, and followed by gastric. I didn't know that gastric pain can be so excruciating, and there's this nagging cramp every now and then. Hopefully it'll self-recover by next week.

Seeing that I go to bed much earlier than before, and knowing that I'd been to the doctor, my boy appears to be very concerned. On couple of nights, he would come to my bed side and ask me whether I'm feeling better and stroked my forehead, chest and stomache. Ohh... whatever pain there is would have been soothed. Just today, after hearing that I'm still not well, he asked me to go to the doctor again "...and if I still don't recover, can see the doctor 1000 times". So innocent and yet so lovable and touched.

Regardless, I've been thinking of baking something else to contribute to this month Aspiring Bakers , to use up all the egg whites and to make something out of the 3 lemons that have been sitting in my fridge for a long time.


I'm glad that I've at least accomplished baking something today. Not only that, I overcome my fear of making a swiss roll - fear that it will not roll up at all, fear that it will crack and break mid-way, fear that it will be too dry, etc. I'm also more ready to try it because I got a proper sheet pan (which I just bought and used it to make Zak's Strawberry long bus cake), and there's a highly recommended recipe for sponge cake/ swiss roll ( which I'd also used it for Zak's Strawberry long bus cake).


Afterall, the rolling is not as daunting as it seems to be *phew*. And I'm satisfied with the texture and appearance, this being my first try. You can be assured that I'll be trying out other flavours and designs in time to come.


Passing the pulps through the strain to extract the juice


Passionfruit Sponge Cake
(Recipe adapted & slightly modified from Kitchen Corner)

Ingredients/ Method:

A) 100g egg yolk (about 6 eggs)
20g caster sugar

B) 160g egg white (about 4.5 eggs)
75g caster sugar

40g unsalted butter
55g plain flour (I substituted with cake flour)
2tbsp passionfruit juice (extracted from 2 passionfruits, see above picture)

1. Prepare a baking tray (11" x 14") lined with baking paper. Melt the butter than set a side to cool.
2. Using electric mixer, whisk the egg yolks with sugar in a double boiler until thicken and pale.
3. In another bowl whisk the egg whites with caster sugar until stiff peak.
4. Fold the egg yolks into the egg whites then gently fold in the sifted flour.
5. Pour some mixture (4) into a clean bowl then mix in the melted butter and passionfruit juice until well combine. Pour back into the mixture of (4) and mix gently until everything well combine.
6. Pour the batter into prepared baking tray and spread evenly.
7. Bake at 190 deg C for 12 minutes. Be careful not to over bake it.
8. Remove the cake from the baking tray immediately when it is out from the oven and place on a wire rack to cool. Tear out the side of the baking paper and let it completely cool down and ready to use.

Passionfruit Cream
1/2 cup whipping cream
3 passionfruits

1. Whisk whipping cream until stiff peak.
2. Add in passionfruit pulps into whipped cream, one at a time until well combined.
3. Stored in fridge until ready to use.


How to Roll
1. When the cake is cooled, removed the parchment paper.
2. Put a new piece of parchment paper on the cooled cake. Gently turn the cake using another wire rack (or using the sheet pan).
3. Spread passionfruit cream on the entire cake.
4. Putting a clean dry kitchen towel under the cake makes rolling easier.
5. Lift up the parchment paper and roll the cake about 1 inch and hold to set the position. Using 2 hands, start to roll the cake using the parchment paper, and when in rolling motion use one hand to lift up the kitchen towel and continue to roll till the end.
6. Tighten the rolled cake and place the cake seam side down.
7. Fold the 2 sides of the parchment paper (like a candy sweet) to hold the rolled cake and put in the fridge to set the shape.


I'm submitting this to Aspiring Bakers #5: Fruity March hosted by Jess of Bakericious.

This cake is very soft and fluffy, and the passionfruit cream gives a refreshing taste! Do give it a try :))

Saturday, March 5, 2011

4 years ago....

4 years ago and on this day and time, I was still in the delivery room and just had the first hug from my lovely boy! Yes, Zakris is turning 4 today and we had a simple celebration at home with our family and relatives.

The day before, we had an early celebration at the school with all his friends from nursery 2. He was so happy and excited, looking forward in anticipation to both the celebrations at school and home. How he has grown from without knowing what is birthday to one who will ask for birthday parties! He knows how to say nice things to mummy to make me happy, give me hugs & kisses and say I love you <3>

Every year, I would ask my boy the cake he wishes to have for his birthday. Although a very young boy, he is someone who has a mind of his own and we always encourage him to make his own decisions . This year theme is supposed to be a bus depot cake as wished, but it is really too tall an order for me. I 'negotiated' for just a bus cake, no depot, and he agreed with having just 2 buses - one double-deck bus bus and a single-deck bus. As usual, I would keep thinking for weeks on the design and how to do it, what sponge cake recipe to use, what flavours, fondant, buttercream or whipped cream, etc. There are always so many ideas and thoughts running through my head before finally deciding on the Cake to make.


No matter how much planning, hiccups are very common for me. First, my 2 batches of lemon and greentea macarons totally failed and went to the bin - scatterbrain me forgotten to sift the icing sugar and almond meals :-( Then, when preparing the sponge cake, my egg yolk mixture became scrambled eggs...oh no! Followed by, I mis-read the sponge cake recipe resulting in a smaller sponge base, hence no 2 buses (sorry Zak), only one bus - a long/ bendy one. Next, I mis-calculated the amount of buttercream needed and I only managed to pipe one-third of the cake. Omg! I didn't want to start preparing the buttercream all over again as time is running short, and after some hesitation, I decided to use whipped cream instead for the remaining piping. Luckily and finally, I was able to present the cake to my lovely birthday boy <3>
Plain Sponge Cake
(Recipe adapted from Kitchen Corner and visit Honey Bee Sweets for very useful step-by-step pictures)
Ingredients/ Method:
40g unsalted butter
100g egg yolk (about 6 eggs)
20g caster sugar
160g egg white
75g caster sugar
55g plain flour

1. Prepare a baking tray (11" x 14") lined with baking paper. Melt the butter than set a side to cool.
2. Using electric mixer, whisk the egg yolks with sugar in a double boiler until thicken and pale. 3. In another bowl whisk the egg whites with caster sugar until stiff peak.
4. Fold the egg yolks into the egg whites then gently fold in the sifted flour.
5. Pour some mixture (4) into a clean bowl then mix in the melted butter until well combine. Pour back into the mixture of (4) and mix gently until everything well combine.
6. Pour the batter into prepared baking tray and spread evenly.
7. Bake at 180C for 12 - 14 minutes. Be careful not to over bake it.
8. Remove the cake from the baking tray immediately when it is out from the oven and place on a wire rack to cool. Tear out the side of the baking paper and let it completely cool down and ready to use.


Decorate
1 punnet of strawberries
Swiss meringue buttercream

1 cup whipping cream + 3 tbsp icing sugar (sifted) **

**Whipped cream is used because I don't have enough buttercream :p.


I am submitting the Strawberry Long Bus Cake to Aspiring Bakers #5: Fruity March hosted by http://bakericious.blogspot.com/.


Other than baking the birthday cake, I also prepared Refreshing lemongrass drink shared by Jane of Passionate about Baking. The drink is really refreshing and good, but I prepared in "limited edition" so not all guests get to try it. I must say this is really a keeper!


Refreshing Lemongrass Drink
(Recipe adapted and slightly modified from Passionate about Baking)

Ingredients/ Method
8 Lemongrass, chopped and mashed lightly
3 litres water
10 tbsp Sugar
2 Lipton tea bags

1. Boil lemongrass and water in a pot.
2. Remove from heat.
3. Add tea bag to infuse, followed by sugar.
4. Remove tea bag after about 10 mins.
5. Let the lemongrass infused in the water overnight as it cooled.
6. Strained into a bottle and refrigerate.
7. Serve with ice.


Wishing Zakris a very Happy Birthday & 健健慷慷, 快高长大!

Sunday, February 27, 2011

Steam Carrot Cake (萝卜糕)


I had another go of this carrot cake recipe which was originally shared by Honey Bee Sweet. This time, I added more of everything - radish, mushroom, dried scrimp, chinese sausage (腊肠), but forgotten I had to increase the liquid and flour and as a result it was more 'densed' with ingredients! Nevertheless, it still tasted good... we love it steamed than fried. Healthier choice and less cleaning to do without the frying (",)

Ingredients/ Method
(Adapted and modified from Honey Bee Sweet's Dim Sum Fried Carrot Cake)

Set A:
650g white carrot / turnip, peeled and shredded
340ml water

Set B:
5 shallots, peeled and chopped fine
3 tbsp dried shrimp, soaked and cut into smaller bits
7 dried mushroom, soaked in water till soft, then cut into small chunks
3 Chinese sausage, casing removed and cut into small chunks
3 tbsp vegetable cooking oil

Set C:
155g rice flour
15g corn flour
15g wheat starch powder
340ml chicken stock (or use 340ml water + 1 chicken bouillon cube)
  1. In a large pot, add shredded carrot and water and start boiling mixture. Cook for about 5 to 8 minutes till the vegetables are slightly cooked. Do not throw about the water, leave the whole mixture together and set aside till needed.
  2. In a saute pan, add vegetable oil at medium heat and stir fry the shallots till fragrant. Then add in Chinese sausage, mushrooms and dried shrimp. Cook mixture for a couple minutes then add the carrot water mixture in. Let it stew for about 8 to 10 minutes and then off the fire. Set aside till needed.
  3. In the meantime, prepare the steamer with boiling water and grease a 8" round steam pan lined with parchment paper.
  4. In a large mixing bowl, add rice flour, corn flour and wheat starch. Pour in the chicken stock and mix well. Then pour the carrot mixture into the flour mixture and stir well. The mixture will be lumpy and thick.
  5. Pour it into the prepared steamer pan and let steam on medium heat for about 40 minutes till cooked.
  6. Remove from steamer and let cool completely before cutting into it.
Note:
a) Remember to increase the liquid and flour to have more kueh than ingredients!
b) More shallots to be added as requested by T.
c) I did not use parchment paper, instead I oiled the pan so that it will not stick.


As I made this on Saturday afternoon, I re-heated the the carrot cake by steaming them again for about 5 mins this morning. Slice and serve for our simple breakfast today!

Monday, February 14, 2011

Strawberry macarons

Love In The Air ....
Happy Valentine's Day


With my success with the chocolate macarons, I'm gearing myself to try out other flavours and colours of these lovely macarons.

However, without proper planning and research, it spelt trouble and failure! My attempt to replace the cocoa powder with cranberry sauce only produced flat meringue, not macarons. I first blended the almond powder and icing sugar, set aside, and followed by blending the cranberry sauce. Few mistakes, (a) cranberry sauce is not blended fine enough (there are still bits of cranberry), (b) blending almond power mixture and cranberry sauce produced very gluey batter, which make it very difficult to fold into the egg white without deflating all the bubbles, (c) continue to pipe and bake even though the batter look very unpromising.

I then proceeded to read more blog posts about macarons, and came out with the Strawberry Macarons. I was not very hopeful initially, but the outcome turned out acceptable. The only complaint that I have is the faint colour of red, and the not-so-smooth dome. Anyway, Love is not always smooth, there are ups & downs. More trials & errors in macarons, and practice make perfect!


Strawberry Macarons

Ingredients/ Method:
(Makes about 36 pieces or 18 sandwiches)

50g icing sugar
37.5g almond powder
1 large egg white, room temperature (about 36g each)
32.5g caster sugar
2 -3 drops of strawberry emulco

1) Preheat oven to 150 deg C.
2) Line 2 baking sheets with parchment paper and have a pastry bag with a plain tip (about 1 cm) ready.
3) Grind together icing sugar with almond powder so there are no lumps, using blender or food processor.
4) In a bowl of standing electric mixer, beat the egg white until they are foamy. Add sugar in 3 batches and whip egg white until very stiff and firm.
5) Add in strawberry emulco to the egg white mixture and beat until colour evenly blended, about 5 seconds.
6) Carefully fold in the dry ingredients in two batches into the egg whites mixture using the mixer on low-medium speed, about 5-10 seconds . When the mixture is just smooth and there are no streaks of egg white, stop mixing and scrape the batter into the pastry bag (standing the bag in a tall glass helps if you’re alone).
7) Pipe the batter like a v-shape on the parchment-lined baking sheets. Evenly spaced one-inch (3 cm) apart.
8) Rap the baking sheet a few times firmly on the counter top to flatten the macarons, then bake them for 15-18 minutes. Let cool completely then remove from baking sheet.
Filling can be anything, I'd used nutella and peanut butter this round.

Note:
1) Smooth the piped batter if rapping the baking sheet did not give a smooth dome/ surface.
2) There's no need to rest the macarons before baking. I put them straight into the oven after they are being piped.
3) So far I use Glad's baking paper for most of my baking and these macarons can be easily removed using them too.
4) Add more colouring or emulco to have more pretty/ obvious colour.

I'm submitting this to Aspiring Bakers #4: Love In The Air which is hosted by Ellena of Cuisine Paradise for this month's theme.

Sunday, February 13, 2011

Chocolate macarons


With all the CNY baking, I've got so many egg whites left. For the past few years, these egg whites will be thrown away (*heart-ache*) cos I don't how else I can do with them. This time, I've put them in good use, in fact, I'm very happy with the outcome!! Macarons!! However, I did failed on the first attempt using another recipe and I was like, "...well, these egg whites would have gone to waste anyway ;( " I've read of many failed stories, and that macarons are not the easiest to bake. I agree and disagree. Why? Depends on the recipe, I would say.


My first failed attempt! No feet & the macarons cannot be
removed from the parchment paper. Only "empty" shells left.


Through my sis's close buddy, whom we got closer because of our baking interest, she recommended me an almost fail-proof chocolate macaron recipe by David Lebovitz. I would recommend to anyone who wants to try out macarons! When the macarons came out from the oven, I can see the nice little feets, shiny & firm dome! Happy!


Whilst filling up the macarons, Zakris took one and said it's nice. Returned to the kitchen and took another 2 more, followed by saying it's very nice! Even T commented that it's nice too! Very happy! I've to add that Zakris has tried more macarons than us, but I think he's basically attracted to the arrays of colour and these super-sweet biscuits. I'm not as sweet-toothed though.

Chocolate Macarons
Ingredients/ Method:
100g icing sugar
50g almond powder
25g unsweetend Dutch-process cocoa powder
2 large egg whites, room temperature (about 36g each)
65g caster sugar
1) Preheat oven to 180 deg C.
2) Line 2 baking sheets with parchment paper and have a pastry bag with a plain tip (about 1/2 inch - 2cm) ready.
3) Grind together icing sugar with almond powder and cocoa power so there are no lumps, using blender or food processor.
4) In a bowl of standing electric mixer, beat the egg whites until they are foamy. Add sugar in 4 batches and whip egg whites until very stiff and firm.
5) Carefully fold in the dry ingredients in two batches into the egg whites mixture with a rubber spatula. When the mixture is just smooth and there are no streaks of egg white, stop folding and scrape the batter into the pastry bag (standing the bag in a tall glass helps if you’re alone).
6) Pipe the batter on the parchment-lined baking sheets in 1-inch (3 cm) circles (about 1 tablespoon each of batter), evenly spaced one-inch (3 cm) apart.
7) Rap the baking sheet a few times firmly on the counter top to flatten the macarons, then bake them for 15-18 minutes. Let cool completely then remove from baking sheet.

Filling
1 portion of Nutella
1/3rd portion of cranberry sauce

1) Mix well and spread on the macarons.


Note:
1) I use Van Houten cocoa powder instead as this is what I had in my kitchen.
2) I bake the macarons at 150 deg C.
3) There's no need to rest the macarons before baking. I put them straight into the oven after they are being piped.
4) As I have problem using the spatula, I used my electric mixer - balloon whisk - to mix the dry ingredients with the egg whites. This takes about 5 seconds on low-medium speed.
5) So far I use Glad's baking paper for most of my baking and these macarons can be easily removed using them too.
6) My piping tip is rather small (less than 0.5cm) and they works well.
7) I piped the batter about 1.5cm as I think small macarons are more cute.